HPL-sheets as balcony edging explained in 3 simple steps
Posted on May 4, 2018
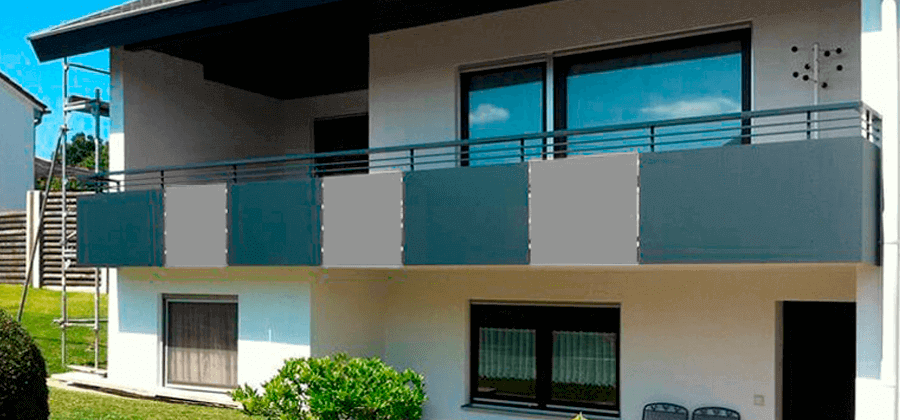
Learn how to step by step build a balcony border made of our HPL panels. With all the important information about the weatherproof panels made of high-pressure laminate.
Who has not experienced this - the new building is almost ready for occupancy, only the balcony cladding is still missing. But the ravages of time can also mean that one or the other balcony surround needs renewal after quite a few years.
HPL panels are an inexpensive and durable solution for balcony cladding, balcony edging or simply privacy screens. In addition, these panels can be easily installed by the user with a little manual skill, so that high costs for experts can be saved.
The following instructions will help you to build your own privacy screen from HPL sheets in just a few steps.
This is how balcony cladding made of HPL panels is easy and safe to do
What are HPL sheets?
The term HPL is familiar in professional circles and has not been unknown to do-it-yourselfers for a long time. But what material is it actually and what are the strengths and weaknesses of this material?
HPL stands for High Pressure Laminate and aptly describes the production of the material. Countless layers of paper or cellulose fibre are pressed together with suitable resin-based binders under high pressure. The result is a dense, hard and at the same time tough building material that is ideal for any type of balcony edging, for example.
For a durable and insensitive surface, the laminate is provided with a top layer that is UV-resistant and insensitive to scratches and impacts.
Advantages of HPL panels
- Resistant and insensitive to weathering
- Very durable without fading or warping of the material
- Easy to process
- Varied in design through selection of appropriate coatings
Disadvantages of HPL panels
- Material tends to splinter or tear at sharp edges
- Substructure required, as panels are not statically loadable
Structure of a balcony cladding made of HPL sheets
Once the decision has been made in favour of a privacy screen made of HPL panels, the balcony cladding can be created yourself in the following steps with a little manual skill.
Required tools
The familiar tools that are also used for wood or metal processing are sufficient for processing HPL panels. First and foremost, this is a drilling machine with drills and a countersink, measuring and marking tools, screw clamps or mounting clamps, as well as pieces of wood or similar to place underneath.
The measurement
Since it is quite difficult to cut the sheets cleanly and beautifully with hand tools, it is recommended to buy the HPL sheets already cut to size. For this, it is of course necessary to take the measurements at the specific location of the balcony enclosure. Especially if you have less experience, it makes sense to create the substructure first, if it is not already available. Once this is finished, the exact measurements for the privacy screen can be taken easily and without theoretical considerations.
When determining the size of the panels, it is essential to consider the thermal expansion of the HPL panels. Especially when the balcony edging is exposed to direct sunlight, the material expands and the total length of the individual panels changes. This effect has two consequences for the planning of the privacy screen: Firstly, the individual panels must not be butted directly against each other. A panel spacing of at least 6 mm is usual, so that the panels do not butt against each other even when expanding. Otherwise, the surface may be damaged or the panel may even break.
Secondly, the expansion of the HPL panels must also be taken into account when drilling the holes for the balcony cladding. If the screws sit snugly in the hole, the expansion of the balcony enclosure can only take place between the fixing points. As a result, the privacy screen gets unsightly warping. In extreme cases, the panel may also break. Therefore, the holes should definitely be drilled a little larger so that the panel has some room to move. For the usual M5 screws, for example, a hole up to 7.5 mm is recommended, which will still work with the usual screw heads. It is important, however, that not all holes allow movement, but that a fixed point is defined. At the fixed point, the hole should only be approx. 0.3 mm larger than the screw in order to compensate for material expansion in the immediate area of the hole. Ideally, the fixed point should be approximately in the middle of the panel. This way, expansion takes place in all directions and the gaps between the panels shrink evenly with heat. The beautiful appearance of the balcony cladding is preserved.
The substructure
The substructure for the installation of the balcony cladding must of course be able to bear the weight of the privacy screen itself. In addition, however, it must also withstand the loads occurring at the installation site. In the case of a balcony enclosure, for example, this is the weight of people leaning on the privacy screen. If the substructure is not already available, it should definitely either be constructed by a specialist, e.g. a locksmith, or purchased in the form of prefabricated elements with type approval.
The most common substructures for balcony cladding made of HPL are made of steel or aluminium, but sometimes wood is also used. The substructure is either installed by the manufacturer himself or with the help of the enclosed instructions. This ensures that the forces arising from the balcony enclosure are safely transferred to the balcony slab or the house wall.
The attachment
Usually, screws are used to fasten balcony cladding made of HPL panels. These can be made of galvanised steel or ideally stainless steel. This means that even after many years of use, there are no unsightly rust marks on the panel material that could affect the appearance of the entire balcony cladding.
The most common screw size for mounting the HPL panels of a balcony surround is M5. The screws are usually fitted with a washer to cover the larger holes. Cap nuts ensure an attractive appearance of the screw connection and reduce the risk of injury. To match, special screws for such a privacy screen have the same round head as the cap nut.
In addition to the actual drill holes, the spacing of the fastening points is crucial for safe installation of the balcony surround. Depending on the panel size and thickness, there is a certain number of screw connections per panel for the privacy screen in order to meet the legal requirements for fall protection. Exact details can be found in the ETB Absturzsicherung. Alternatively, the manufacturers of the HPL panels will be happy to assist you with the relevant information on the safe installation of the balcony cladding.
In addition to screw fastening, there are other alternative fastening methods, for example riveting. However, these are used far less frequently for balcony cladding, especially because screw connections can be opened and closed again at any time without any loss of material.
The privacy screen is created in 3 steps
Once the substructure has been created and, if necessary, renovated, the installation of the balcony cladding made of HPL sheets can begin.
Step 1: Mark the hole drillings
Since the panels are usually delivered without drill holes, these must first be created. For this purpose, the panels are ideally provisionally attached to the substructure at the location of the later balcony edging. This way, all the necessary holes can be marked in the right place. Errors in measuring are avoided. A second, helping person is helpful for this step. Once the board is in the right place, it is fixed with screw clamps or mounting clamps. Then the holes can be marked through the holes in the substructure.
Step 2: Drill holes
The plate is removed again to drill the torn holes. A suitable and sharp drill is important here to achieve clean holes without ragged or chipped edges. The manufacturer of the selected panels can provide information on the ideal drill for their specific panels. After drilling, be sure to countersink the holes to avoid chipping edges.
Step 3: Mounting on the substructure
Now the HPL board can be reattached to the substructure and finally fastened. This is usually done by means of screws, either with washers or special clamping plates. After a final alignment of the HPL panels, the privacy screen is finished.
Care and maintenance of the balcony edging
Since HPL panels are insensitive and weather-resistant, maintenance is not necessary. Cleaning can be done with water and possibly a little household cleaner.
Summary and conclusion
The installation of a balcony cladding is carried out in the simple steps of measuring and ordering panels - pre-drilling fixing holes - screwing panels together. It can be this simple to create your own balcony cladding. Where other designs quickly make a specialist indispensable, HPL panels allow you to create your own privacy screen in just a few simple steps. This and the positive material properties make HPL sheets the ideal building material for balcony edging, but also for many other applications around balconies, terraces and homes.